How to activate supersampling are on Oculus Rift S

If you have a powerful computer, you can greatly improve image quality in VR-games with supersampling are. Here is a step by step guide on how to do this on the Oculus Rift S.
What is the supersampling are?
The supersampling are is a smoothing method where the image is initially displayed in significantly higher resolution and then resampled to a resolution suitable for VR points. The result is a clearer image with much less flickering pixels.
You can also activate supersampling are for monitor games. In virtual reality the effect of improving the image even more, because the displays are directly in front of the eyes.
What to consider
The supersampling are computationally. If you use supersampling are, you should make sure that your computer is able to consistently reproduce at least 80 frames per second. This corresponds to the refresh rate of the Oculus Rift S.
If your computer plays less frames per second, the game may be jerky and may cause nausea. For this reason, it is important that you have found the correct value of supersampling are.
What you'll need
You need Oculus Tray Tool for activation and optimization of supersampling are . Download the latest version from the web site, Guru3D and install.
What types of supersampling are there?
The following instructions differ universal and individually the supersampling are.
With universal supersampling are the value of supersampling are of your choice is applied to the user interface and VR for all VR games.
With individual supersampling are you assigned a single value for each supersampling are VR games separately. This is important, because every game have different PC requirements.
Individual values for supersampling are VR games "overwrite" the universal significance of supersampling are. To your UI VR also benefit from supersampling are, you can use the universal supersampling are in parallel.
How to activate supersampling are universal
- Open the Oculus tool Tray and clicks the tab "game Settings" (Game Settings).
- By setting "supersampling are the default" (Default Super Sampling), you can activate the universal supersampling are by choosing a value above 1.0. For example, if you choose a value of 1.5 supersampling are, the image is displayed with a resolution of 50 percent higher than the native resolution of the Rift S.
- To activate supersampling are universal, you need to restart the app for the PC Oculus and VR games.
How to activate supersampling are individual
- Click on the tab "game Settings" (Game Settings) in the tool Oculus Tray, and then press "View and edit" (View & Edit) in the section "Profiles" (Profiles).
- In the appeared new window, select "Confirmation sound when you apply the profile" (Audio confirmation when the profile is applied). Thus, each time you launch a VR game with an individual value of supersampling are, you hear sound and know that the individual supersampling are active.
- Click "Create new profile" (Create New Profile) and select the game VR for which you want to set individual value of supersampling are in the drop-down menu "Game / App" (Game/App). If the corresponding game is displayed, click " … " and enter the. EXE file of the VR game.
- For "Super Sampling" to select the desired value for supersampling are for VR games. For starters, the recommended value from 1.2 to 1.5, depending on how powerful your PC is and how graphically demanding the game is. Then click "OK". Now the game should appear in the list of game profiles, including individual value supersampling are.
- Now you can start the game VR. If you hear an audible confirmation, the value of supersampling are successfully activated.
How to assign keyboard shortcuts to VR your PC
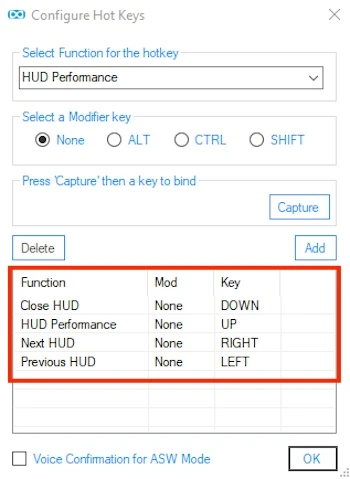
- Click on the tab "Tray Tool" in Oculus Tray Tool, check the "Enable Hotkeys" and click "Configure".
- Select "HUD Performance" from the drop down menu under "Select the Function for the hotkey". Then click "Capture", press the upper arrow key on the keyboard and press "Add". So when you are in the VR application and press the upper arrow key, the PC performance is displayed as a game display, so you can check whether you have the performance reserves, and further increase the value of supersampling are.
- So you can switch between your other useful in-game ads and them again to deactivate, repeat assigning a keyboard shortcut for the option "Next HUD" (the next slot ad = right arrow key), "Previous HUD" (previous = left arrow key) and "Close HUD" (disabling all game displays = down arrow key). Assigning hot keys should look like the following. Of course, you can also use the other buttons.
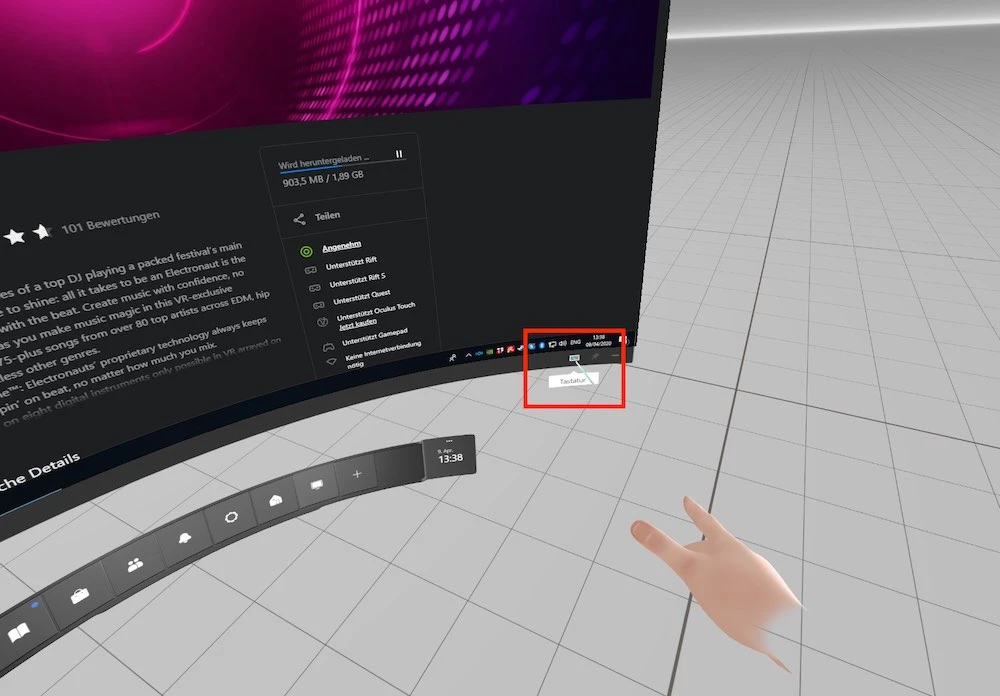
To activate in-game ads, you don't need a real keyboard. Virtual keyboard, Oculus is enough so you don't need to release the touch controllers from his hands.
To do this, open the user interface of the Oculus Rift Dash, clicking Oculus. Then vivite user interface of your PC via Oculus Desktop and click on the keyboard symbol in the lower right corner (see picture). Now you can comfortably push the arrow keys on the virtual keyboard of the Oculus without having to mess with a real keyboard.
How to find the optimal value of supersampling are for Oculus Rift S
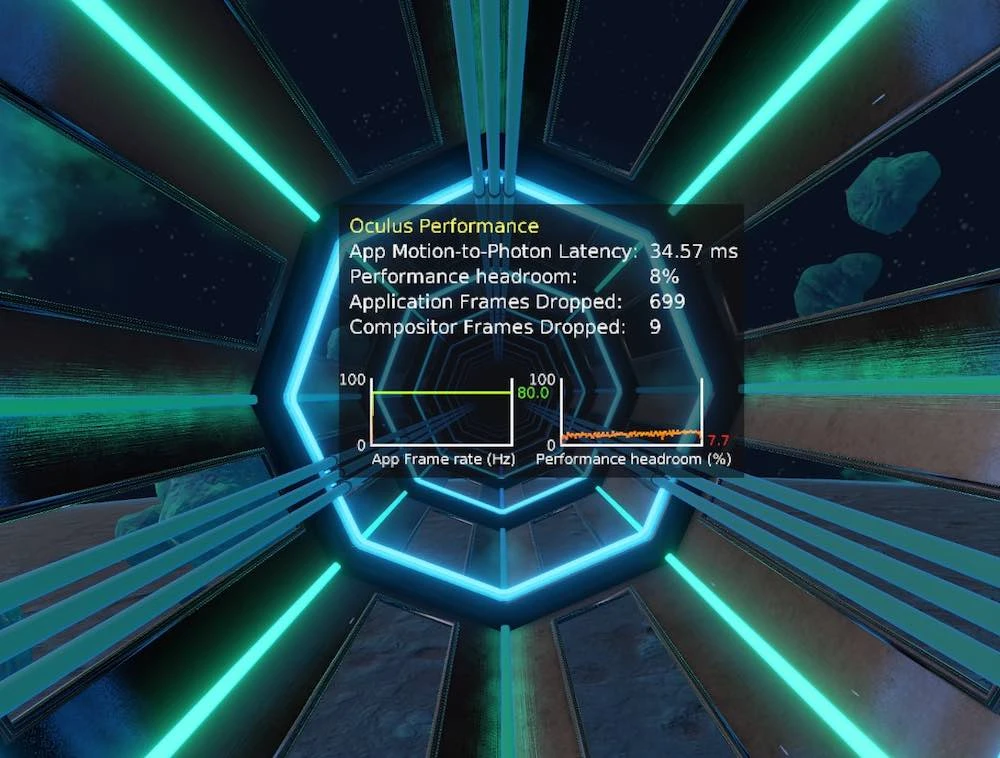
- Run the VR application, which you have assigned the value of supersampling are, and display a game display PC performance by pressing the up arrow key on the virtual keyboard Oculus. You should then see in-game ad shown in the image below.
- Note the value on the right from the left of the chart. It shows how many frames per second your computer calculates (0 to 80). "80" should appear everywhere.
- Right next to the chart percentages are reserves of computing power. If they are close to zero, the speed of rendering images at the computing scene quickly falls below the critical limit of 80 frames per second.
- If both values are in the green zone, you can set the supersampling are higher. VR close the game, open the corresponding game profile and adjust the value of supersampling are. Save the profile and restart VR.
- Now check whether your computer is stable 80 fps, and if you have enough reserve performance of your PC. If not, again, reduce the value of supersampling are. If you have enough performance reserves, you can increase this value until your computer reaches the limit.
- Then disable the display of your computer's performance in the game by pressing the down arrow on the virtual keyboard Oculus.
After you assign hot keys as described above, press the left or right arrow key on the virtual keyboard Oculus, until the in-game display of the "Layer 0 Info". Oculus now close the Dash by clicking Oculus to get back in the game VR. Now the current value of supersampling are in the game VR is displayed next to "Pixel density".
Warning: In games SteamVR that display does not work reliably.
You should avoid this error supersampling are
In some games, VR has the opportunity to set the supersampling are in the game. Never use both options of settings, otherwise the values of supersampling are can be multiplied.
To avoid this, the supersampling are turned off or in Oculus Tray Tool or in the corresponding VR application.
How to disable supersampling are using Oculus Tray Tool:
- Click on the tab "game Settings" in the Oculus Tray Tool (Game Settings).
- If you only use supersampling are versatile, set the value to "0" to "Default Super Sampling". If you use individual value supersampling are, call the appropriate slot profile and assign a value of supersampling are "0" for VR games.
- Now you can run the game VR and set the supersampling are in the game menu.
It is better to set the supersampling are in the Oculus Tray Tool, if possible, because here you have more flexibility to work with the values of supersampling are.
As the supersampling are working with SteamVR
If you need to play VR games via Steam with Oculus Rift's, you can also use instead of a SteamVR Oculus Tray Tool to set supersampling are.
In SteamVR you can also install universal and individual supersampling are. Here's how to do it:
- Open settings SteamVR. You can do this using the overlay SteamVR or by selecting the gear icon on the toolbar SteamVR.
- Then click the "Video"tab.
- To configure universal supersampling are using SteamVR, follow these steps: install the "rendering Resolution" to "custom …". The Resolution "slider on the eye" corresponds to the setting "supersampling are the default" in Oculus Tray Tool. This means that you can use to install universal values of supersampling are for the user interface and SteamVR games SteamVR. A value of 150% corresponds to the value of supersampling are 1.5 V Oculus Tray Tool. Hell shows the best setting for your computer, measured its performance.
- To configure individual supersampling are using SteamVR, follow these steps: open the "video Settings for applications", select your game SteamVR from the drop-down menu and set the desired value for supersampling are. As in the Oculus Tray Tool, individual value supersampling are universal overwrites the value of supersampling are.
- Restart the game SteamVR and use in-game displays of the Oculus Tray Tool to check whether the set value or supersampling are still there are opportunities for improvement. Do so in accordance with the above instructions until you find the optimal value of supersampling are.
How to disable supersampling are using SteamVR
You have to decide whether you want to set the supersampling are using Oculus Tray Tool or via SteamVR. Otherwise, can happen multiple supersampling are, which you absolutely must avoid!
To disable the supersampling are using SteamVR:
- Open settings SteamVR. You can do this using the overlay SteamVR or by selecting the gear icon on the toolbar SteamVR.
- Then click the "Video"tab.
- Deactivate supersampling are universal: set "rendering Resolution" to "custom …". Then select "permission on the eye" 100 percent. Then the resolution should be "1504 1616 x" or "x 1648 1776", depending on the quality setting selected in the app Oculus for PC (see the Tab "Devices" -> "Rift's and Touch" -> "configure graphics"). -> the quality or performance).
- Deactivating individual supersampling are : You should also make sure that you set the value 100% in the "video Settings on the app" for all VR games.
- Thus, universal and individual supersampling are using SteamVR should be deactivated so you can easily use the Oculus Tray Tool.